Monday, March 16, 2015

A Black and Gold Affair

Hi everyone! Whew, after a crazy few weeks I have finally found some time to myself and you know what that means...blogging and nail art! Yayyyy!

Ok, so the color gold and I have a complicated relationship. Every time I see someone sporting a gold colored manicure, I jump on the band wagon, run to the nearest drug store I can find, and buy a few gold polishes. But, the second I come home and try out the polishes, I think "Um...no." I'm not sure what it is, but as much as I love how gold polish looks on others, I just don't think the color compliments my skin tone. That being said, whenever I feel like wearing gold, I try to mix it in with another color. Here is a perfect example!


If you ask me, I think you honestly can't go wrong with black and gold. Something about this color combo always look classy. For this design, I used Maybelline Color Show Twilight Rays, a heavily pigmented black jelly polish (opague in two coats) filled with little gold flakies. I paired Twilight Rays with Sinful Color's Paris, which is your typical gold glitter topper. I needed 3 coats of Paris to achieve the opacity you see on my middle finger. And finally, I added a plethora of gold toned studs because if you can't tell from some of my other designs (see here and here) I tend to like my nail art over the top lol.


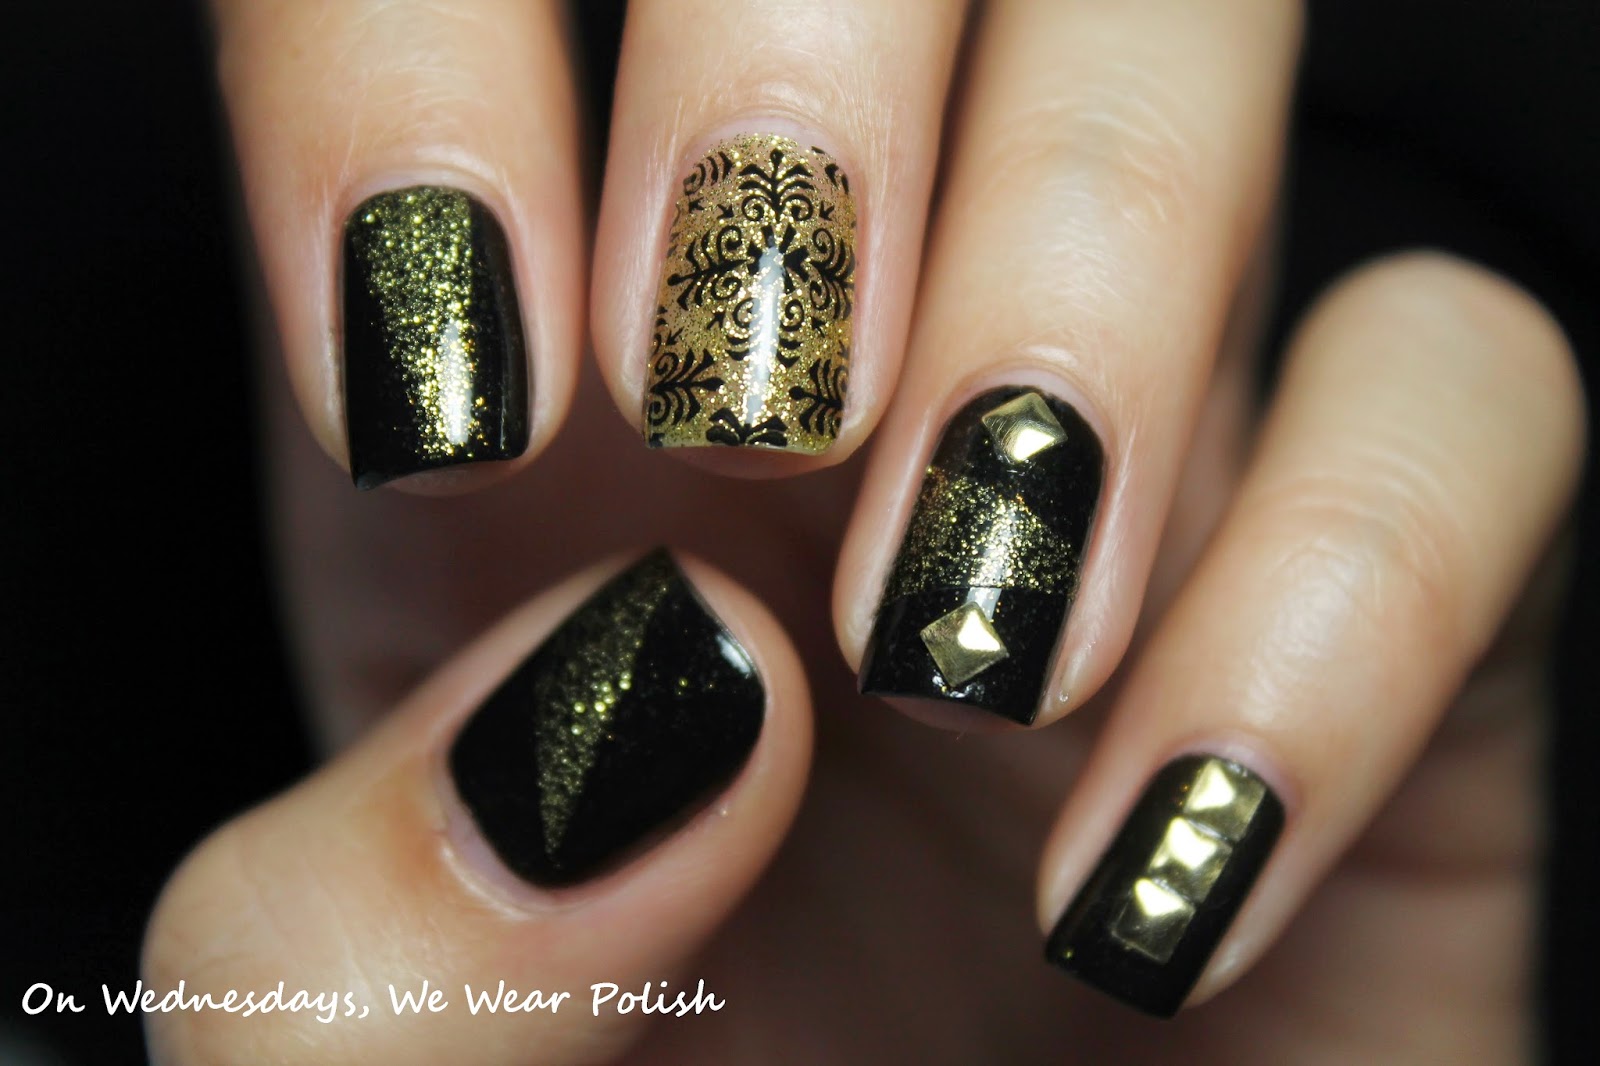
In my search for the perfect gold glitter (and trust me I've gone through quite a few brands/bottles lol) I have learned that the tone of the gold is what really sways me toward a particular polish. Although I used Paris for this mani, I tend to be attracted to gold polishes that are closer to bronze than yellow.

These are some of my favorite gold polishes:

Starrily - King Midas
Photo From http://starrily.com/collections/all/products/midas


Maybelline Color Show - Bold Gold
Photo From http://www.maybelline.com/Products/Nail-Makeup/nail-color/Color-Show-Nail-Lacquer-The-Holographics-Collection.aspx

Wet and Wild - The Gold and the Beautiful
Photo From http://www.drugstore.com/wet-n-wild-fast-dry-nail-color-the-gold-and-the-beautiful-223c/qxp406117


I am always looking for new polishes to try out. Do you have a go-to gold polish? Leave me a suggestion in the comments! Thanks for stopping by :)

Maybeliline Color Show - Twilight Rays
Sinful Colors - Paris
Konad Black
Moyou London Fashionista Collection 07 (XL) - Lace Pattern

Wednesday, February 25, 2015

Glitter Bomb Mani

Hey everyone! I’ve been sick in bed the past few days so my nails haven’t been seeing that much action lately. It’s just been a whole mess of sneezing, tissues, and constant napping.

Anyway, today I have a look I wore quite a few weeks ago.
I call this, “The Glitter Bomb”.  And no, this has nothing to do with the glitter bombs you can send to your enemies lol. Although this mani did teach me that cleaning up glitter is a bi^*%.


So, how did I come up with this? Indecision, actually. Although I must have 300 polishes sitting in my stash, on one day in particular, I decided that I didn’t feel like wearing any of the polishes in my collection. Then a random idea sparked into my head. Why not just use glitter?


For this mani, I first started with a black base coat. As soon as the base coat was painted (very wet) I poured loose glitter (from the Born Pretty Store) onto my nails, using three different colored glitters. In sections where the glitter did not stick as well, I simple added a drop of clear topcoat and added more glitter as necessary. When the entire nail was dry, I added 2 coats of top coat (or the finish would have been more grainy then you see here) And Voila! A mani Ke$ha would be proud of!


Looking to create this mani for yourself? Pick up some glitter at the Born Pretty Store and use my coupon code CJCX31 for 10% off your order!

Saturday, February 14, 2015

A Ridiculously Mushy Valentine's Day Mani

Happy Valentine's Day!

"All you need is love. But a little chocolate now and then doesn't hurt"
- Charles M Schulz


KB Shimmer - Let's Not Coral (middle finger)
Revlon - Stunning (glitter topper)
Revlon - Classy (light pink)
California Velvets - Winter White
Hit Polish - Sky Diamonds (silver glitter topper)
Sally Hansen - Celeb City (silver)
Moyou London Comics Collection 05 - Couple
Moyou London Kitty Collection 02 - Rose
BM 02 - Roses

Friday, February 13, 2015

Roses are Red - A Valentine's Day Mani

Hey everyone! As you can see, my obsession with floral nail patterns continues lol. This design is perfect for anyone looking for an easy, last minute, Valentine’s Day design! It’s also perfect for Valentine’s date night!


For this design, I started with a red glittery base with multicolored glitter. Once that dried, I stamped over the red with a full nail design featuring rose cutouts. The stamped floral pattern I used is from Moyou London, a company I tend to talk about a lot. Hands down, they are probably my favorite go-to company for nail plates. I purchased this plate quite a while ago (like maybe over a year), but wasn’t sure how I wanted to use it. I finally decided that pairing it with a bright glittery red base would really do the plate justice.


So is anyone excited about Valentine’s Day? Most of my friends are throwing anti-Valentine’s Day parties or spending the night getting drunk with friends. Everyone I know either hates the holiday completely or absolutely loves it. There’s never an in between.

My boyfriend and I are celebrating today because trying to go out on Valentine's Day is always crazy. I think he might be making me an Oreo cheesecake. OMG, I’m a sucker for cheesecake.

What are you doing for Valentine’s Day? Do you love it or hate it?


Nabi - Red (base coat)
W.I.N. - 50 (red glitter topper)
Konad Black
Moyou London Pro Collection 07 (XL) - Roses

Monday, February 9, 2015

Where do you Look for Inspiration?

Hey everyone! Since Valentine's Day is coming up, I decided to get you guys some flowers! Okay, so I didn't buy these, I painted them...but they are still pretty fabulous, right? This free handed floral (yayy for practicing my freehand) was inspired by a skirt hanging in my closet.


As much as I love blogging, sometimes coming up with several new/ unique designs every week can be challenging. Lately, I've been in a kind of nail art slump. As much as I'd been researching new nail art techniques and looking up fun mani's, I had a hard time thinking up my own creative designs. 

However, sometimes finding inspiration is simply a matter of looking around you! This week, as I was rummaging around in my closet, I came across one of my favorite skirts and suddenly a light bulb went off. I found my nailspiration :) Turns out all I had to do was turn off my brain and stop trying so hard lol.


But it happens to everyone. Every once in a while, our muse may go on vacation and leave us with a paintbrush in our hand and an empty canvas. But what do YOU do when that happens? Where do you look for inspiration? Comments and ideas always welcome!


Milani - Black Swift
Milani - White
Revlon - Cherries in the Snow
KB Shimmer - Let's Not Coral
Lynbdesigns - Eloquent Dust

Wednesday, January 28, 2015

Geometric Nail Art


Hi everyone! I’ve been having a lot of firsts lately. Last week I decided to try my very first chevron design. This week, I was feeling brave and decided to try some geometric nail art! What do you think?


When I finished this design, I wasn’t too crazy about it, but it’s really starting to grow on me! For this look, the most important tools I used were Seche Vite, scotch tape, and a thin nail art brush. My first step was painting my white base (2 coats using Milani White). My second step was to add a coat of Seche Vite, for two reasons. One, this topcoat sped up my drying time (because really I have no patience lol). Two, having a clear coat was helpful after my third step, using tape to create the black geometric designs. Let me explain.


After I did my coat of Seche Vite, I placed the tape where I wanted my design to go and painted that section in black. In most cases, when I removed the tape immediately after painting the black design, I had a perfectly clean line. (Note: It’s best to pick up the tape immediately after painting while the coat is still wet. If you let it sit and dry too long, when you pull up the tape, you may also pull up some of your base coat.) However, because I’m not perfect (Gasp! I know, right!), there were a few instances where I pulled up the tape and some of my black polish had seeped underneath, creating an uneven line. When this happened, I simply pulled out my thinnest nail art brush and 100% acetone. Using the brush dipped in acetone, I was able to paint over the imperfect black lines and “erase” the imperfections to create straight black lines. In order to help contour the black lines, I had to sweep my brush over my white base (which should have gotten messed up, being that 100% acetone really eats through polish). However, because I had first applied a coat of SV (between my white base and black geometric shapes), my brush only affected the clear top coat, leaving my white base underneath untouched!

I just read that over and I know it’s a bit confusing. I really hope at least some of that makes sense lol

Anyway, not too shabby for my first geometric right?


Like what you see? Check out my other designs on pinterest!

Milani - White
Milani - Black Swift
China Glaze - Salsa

Saturday, January 24, 2015

Shiny Chevrons

Hey you guys! I'm so happy it's Saturday. Aside from sleeping in and being in pajamas all day, I finally have time to blog and share a design I wore recently.


So the past few weeks, I've noticed that chevron nail art has become a thing and I wanted to try out the look for myself. For my base, I used Essie's Beyond Cozy, which is a silver glitter polish with slight gold undertones. I was originally attracted to Beyond Cozy precisely because it isn't your typical perfect silver polish. In person, it almost looks like its muted silver with a bit of tarnish to it. Although Essie does not list Beyond Cozy as a textured polish, it does dry kind of matted and grainy. I liked the way it looked when it dried, so I stamped over it and decided to skip topcoating altogether.

Although most people use nail vinyls for chevrons, I used a chevron design from one of my bundle monster plates to create this look. I haven't experiemented with vinyl's yet, but I definitely want to pick up some soon. Does anyone have any suggestions on brands I should try? Leave me a suggestion in the comments section :)


Like what you see? Check out my other designs on pinterest!

Essie - Beyond Cozy
Konad Black
BM423 -  Chevron Pattern