Hola! So because I should be packing for a trip I am taking next week, I'll make this a short post for today. I believe this palm tree manicure is totally appropriate because this time next week, I'll be on vacation, partying it up in fabulous Las Vegas Nevada!!! I'm pretty sure there are a few palm trees in Vegas somewhere.
Anyway, for this manicure the main color I used is an awesome turquoise blue from China Glaze, called Turned Up Turquoise (Neon). This color is so awesome because it has a lovely sparkle to it and dries super quick. For the base of my rings fingers (in this order) I used China Glaze Turned Up Turquoise, then Loreal's the Muse's Inspiration (deep orange), China Glaze Sunshine Pop (yellow), then NK Clementine (brighter orange), and finally Loreal's the Muse's Inspiration again on the tip of my nail. Finally, I used Wet and Wild The Gold and the Beautiful (gold glitter) over the yellow (Sunshine Pop). To get the swirly affect, I painted all of the colors (turquoise, oranges and yellow) onto my nail at the same time so all of the polishes were wet and malleable. Then using one of my nail brushes, I swirled the polishes into each other. Once the colors were dry, I added some of the gold glitter and then when everything was dry, I stamped on the palm tree.
Doesn't this manicure want to make you be sitting on a beach somewhere in the Bahamas? Even though I won't be in the Caribbean, I can't wait til next week. I cannot tell you guys how excited I am about my trip! Anyway, since I will be away I won't be posting for a while (a little over a week).
I know, so sad : <
But stay tuned! Because I will have some fabulous mani's ready for you guys as soon as I get back!
In the meantime, check out my facebook page! Like my page, send me a message, or leave me a comment and let me know what you think of my mani's!
Or you can browse my photos through pinterest or tumblr!
China Glaze - Sunshine Pop (Yellow)
China Glaze - Turned Up Turquoise (Neon)
Wet and Wild - The Gold and the Beautiful (Gold glitter)
Loreal - the
Muse's Inspiration (Deep Orange)
NK - Clementine (Brighter Orange)
Konad Black
SE18 - Palm Tree
Friday, July 12, 2013
Thursday, July 11, 2013
Textured Polish? Say What?!?!?!
So I don't like to brag, but I do have to say I am pretty darn proud of this manicure. The inspiration for this mani comes from another fabulous nail blogger, Chalkboard Nails. Check out her website because all of her stuff is amazing. Anyway, I was super excited about this mani because it let me test out some of my new nail purchases!
Purchase 1: China Glaze Textured Polishes
So I am sure you have heard about the new textured polish craze that is sweeping the nation (or at least the nail polish lovers within the nation). Several big name companies such as OPI, Julie G Gumdrops, and Sally Hansen are now making textured polishes - polishes that do not dry with a glossy finish but with a gritty or course finish. One of the companies that has most recently jumped on the textured bandwagon is Sally Hansen. See an example of what designs you can do with textured polish here.
I have been pretty skeptical about whether I would like textured polishes but wanted to try them anyway. After doing some research, I found a super good deal (6 polishes for $20) for the textured China Glaze collection on amazon and could not resist.
Purchase 2: Hex Nail Jewelry Designs
After reading about this company on Chalkboard Nails and seeing Sarah's manicure, I immediately pulled out my credit card. Hex Nail Jewelry makes nail charms made of brass that are plated in 14k Gold or Silver. The charms are reusable (as long as they are cleaned after each use) and come in any shape you can think of such as flowers, lips, animals, phrases, or bows (like the one I used for my mani). What is really nice about these charms is that they are perfectly sized for your nail (not too big like one of the bows I used in a past mani ). Also, most of their charms come slightly curved, so they can be fitted nicely around the curve of your nail. With a bit of nail glue, these charms will stay on your nail for quite some time. So glad I purchased these!
Now enough talk...this is what happens when you combine nail charms and textured polished (and of course some stamping)
-pauses for dramatic effect -
For the pinky and pointer fingers I first painted two coats of Sally Hansen Hard as Nails Xtreme Wear Green with Envy and once that dried, stamped the designs using Konads white polish. Then for the middle and ring finger I used China Glaze textured polish, Toe-Tally Textured. Once my middle finger was dry, I put a little nail glue where I wanted to put the bow and then stuck the bow on and held it there until it dried (6 days later and it is still on my nail).
Sally Hansen Hard as Nails Xtreme Wear - Green with Envy (lime green)
China Glaze Texture - Toe-Tally Textured (textured orange)
Sally Hansen Hard as Nails Xtreme Wear - Sun kissed (regular orange)
Konad White
BM19 - Polka Dots
BM19- Houndstooth
Bow - Bow No. 1 (Hex Nail Jewelry)
Purchase 1: China Glaze Textured Polishes
So I am sure you have heard about the new textured polish craze that is sweeping the nation (or at least the nail polish lovers within the nation). Several big name companies such as OPI, Julie G Gumdrops, and Sally Hansen are now making textured polishes - polishes that do not dry with a glossy finish but with a gritty or course finish. One of the companies that has most recently jumped on the textured bandwagon is Sally Hansen. See an example of what designs you can do with textured polish here.
I have been pretty skeptical about whether I would like textured polishes but wanted to try them anyway. After doing some research, I found a super good deal (6 polishes for $20) for the textured China Glaze collection on amazon and could not resist.
Purchase 2: Hex Nail Jewelry Designs
After reading about this company on Chalkboard Nails and seeing Sarah's manicure, I immediately pulled out my credit card. Hex Nail Jewelry makes nail charms made of brass that are plated in 14k Gold or Silver. The charms are reusable (as long as they are cleaned after each use) and come in any shape you can think of such as flowers, lips, animals, phrases, or bows (like the one I used for my mani). What is really nice about these charms is that they are perfectly sized for your nail (not too big like one of the bows I used in a past mani ). Also, most of their charms come slightly curved, so they can be fitted nicely around the curve of your nail. With a bit of nail glue, these charms will stay on your nail for quite some time. So glad I purchased these!
Now enough talk...this is what happens when you combine nail charms and textured polished (and of course some stamping)
-pauses for dramatic effect -
For the pinky and pointer fingers I first painted two coats of Sally Hansen Hard as Nails Xtreme Wear Green with Envy and once that dried, stamped the designs using Konads white polish. Then for the middle and ring finger I used China Glaze textured polish, Toe-Tally Textured. Once my middle finger was dry, I put a little nail glue where I wanted to put the bow and then stuck the bow on and held it there until it dried (6 days later and it is still on my nail).
I don't know about everyone else, but this mani screams funky to me.
And surprisingly it wasn't too hard to do!
For my thumb, I first did two coats of Green with Envy and let that dry. Then, using Sally Hansen Hard as Nails Xtreme Wear Sun kissed, I did a splatter pattern (check out this tutorial here). To get the splatter, simply take a straw and dip it into a puddle (or the bottle) of the color you want to splatter your nails with. Then, keeping the dipped end of the straw 3-4 inches away from your nail, blow into the straw on the opposite end with some force, sending bits of polish all over your nail and tada, splatter!Sally Hansen Hard as Nails Xtreme Wear - Green with Envy (lime green)
China Glaze Texture - Toe-Tally Textured (textured orange)
Sally Hansen Hard as Nails Xtreme Wear - Sun kissed (regular orange)
Konad White
BM19 - Polka Dots
BM19- Houndstooth
Bow - Bow No. 1 (Hex Nail Jewelry)
Tuesday, July 9, 2013
Mix and Match Pedicure
So it occurred to me in the past few days that though there are tons of nail blogs out there, no one really posts any pictures of their pedicures. It could be because people have funky looking feet, or as I learned recently, taking pictures of your feet can be kind of awkward...let alone posting these pictures online for everyone to see....
Anyway, though this is primarily a finger nail blog, I've decided that some of my pedicures are way too cute to pass up showing off. Plus, my feet aren't too funky looking. On that note...
Life is way too short to wear only one color on your toes!
Sally Hansen Hard As Nails Xtreme Wear - Blue Me Away (sky blue base coat)
Milani Jewel Fx - Teal (glitter on big toe)
Wet and Wild - The Gold and the Beautiful (gold glitter)
Color Club - Untamed Luxury (fourth toe)
Konad black (stamping)
BM19 - Polka Dots
Monday, July 8, 2013
Pretty in Pink ! (French Mani)
So six flags was amazing. I lost count of how many rides I went on or
how much fried food I had and despite the ridiculous heat, I had a
really good time. There was funnel cake and skull mountain and lots of
random dancing. That's sort of what me and my sister do.....The best part of the day was when my sister and I heard the cha -cha slide
come on and we joined a flash mob. My boyfriend got this picture of the
two of us (I'm in stripes and my sister is in the spongebob shirt)
flash mobbing with a group of 5 year olds and teenagers lol
Yes, random, I know. We are crazy, but it works for us.
Anyway, since I did in fact survive the heat and all of the thrill rides, I thought I would post this mani for today. Now in general, pink isn't my favorite color to wear but I do really like how it looks on my nails. I love the color I used for this mani, not only because it is so vibrant, but because the Duane Reade near me has a bin filled with marked down nail polish so I got it for super cheap. You'll never believe how much I paid for this little beauty...
Just a side note. I would say the last two photos are more representative of what this color looks like in person (I am still working on making a light box so that I can capture the color's of my mani's better : > ). Unfortunately, I was super lazy when I did this mani and after applying the stickers didn't apply any top coat so one of my stickers abandoned ship!
Milani - Pink Out Loud
Silver Nail Tape (amazon)
Flower Sticker (Fing'rs?)
Anyway, since I did in fact survive the heat and all of the thrill rides, I thought I would post this mani for today. Now in general, pink isn't my favorite color to wear but I do really like how it looks on my nails. I love the color I used for this mani, not only because it is so vibrant, but because the Duane Reade near me has a bin filled with marked down nail polish so I got it for super cheap. You'll never believe how much I paid for this little beauty...
Crazy, right? Anyway, since I have been doing a lot of dark mani's lately, I thought I would try one inspired by summer. This is what I came up with...
For this summery look, I used Milani's Pink Out Loud. I absolutely love
this color because of its brightness and the tiny pink sparkles in the
polish. If this doesn't say summer, I don't know what does! And for that
nice clean silver line I used silver nail tape which I reviewed in a
previous post.
The little flowers on my ring finger I bought a few months ago so I
really can't remember where I purchased them, but I am pretty sure the
brand Fing'rs makes something similar that can be purchased in any drug
store (Walgreen's, Duane Reade, etc.)Just a side note. I would say the last two photos are more representative of what this color looks like in person (I am still working on making a light box so that I can capture the color's of my mani's better : > ). Unfortunately, I was super lazy when I did this mani and after applying the stickers didn't apply any top coat so one of my stickers abandoned ship!
Milani - Pink Out Loud
Silver Nail Tape (amazon)
Flower Sticker (Fing'rs?)
Saturday, July 6, 2013
Cookies and Cream (French Mani)
Thank Doctor Who I am off tomorrow too.
I am going to Six Flags Great Adventure with my boyfriend, my sister, and some of our mutual
friends. Unfortunately the forecast
said something about it being 92 degrees tomorrow. So assuming I don’t melt in
the sun or char to death on the rides, I should have another post for
you guys by Monday morning : )
So I know everyone is probably sick of
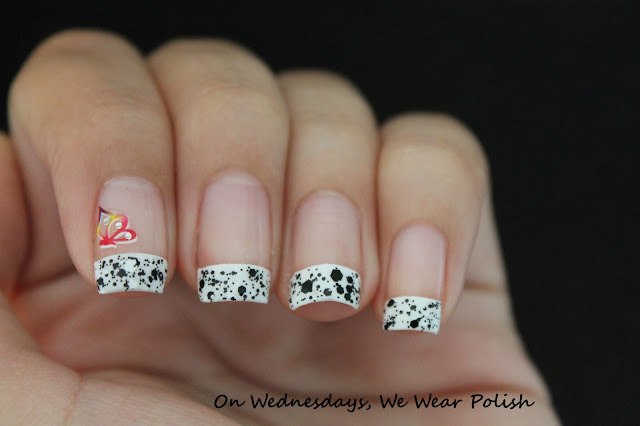
hearing me talk about this brand, but I have yet another color from Maybelline Color Show today, called Clearly Spotted, which is part of their polka dots collection. I absolutely adore this color. The polish has fine black and white matte
glitters, medium black and white matte hexagon glitters, and large black and
white hexagon matte glitters in a clear base. One of the reasons I love this
color so much is because I love polishes with black and white glitters. I would
say I have a tiny obsession.
Anyway, a few months ago when I first started
following More Nail Polish, I learned about the brand, Lynnderella.This brand is extremely exclusive. It's made from scratch and is sold on ebay, where anyone can bid on the polishes.I love Lynderella’s color’s because
they are bright and always filled with glitter and pretty color combinations. However, because these polishes are highly sought after, buying these polishes on ebay can cost you anywhere from $20-$50 (yes, just for ONE bottle of polish). Also Lynnderella tends to sell out of her popular polishes pretty quickly. Anyway, one of the colors that I would love to get my hands on is Lynnderella's, Connect the Dots....
http://www.temptalia.com/lynnderella-connect-the-dots-nail-lacquer-review-photos-swatches |
However, because I have rent to pay, school loans to pay back, and I work too hard for my money, I can't really see myself spending $25 dollars on a single bottle of nail polish (despite how fabulous it is). Thankfully, one of my favorite brands, Maybelline Color Show, came to the rescue with Clearly Spotted...
For this french mani, I first put a piece of tape horrizontally across my nail, leaving about 1/4 of an inch of the tip of my nail free from tape. I then painted on Sally Hansen's White On on the tip of my nail, let that dry and then added Clearly Spotted, the black and white glitter over the white. When everything was dry, I removed the tape. That's how I achieved such a nice clean line. The butterfly decal I believe is from Fing'rs, though I really don't remember. Oh! And I promise the white hexagons are definitely in the polish. They are kind of hard to see because I used a white base.
Doesn't this mani remind you of a cookies and cream chocolate bar?
My cat Mylo definitely approved of my manicure! Infact, he looked down
right excited after he saw it! (Although in reality he was stalking a
fly when I took this photo. I'm thinking he was a tad bit over zealous. I
feel like he might be the next grumpy cat)
Maybelline Color Show Polka Dots – Clearly Spotted
Sally Hansen Hard as Nails Xtreme Wear –
White On
Butterfly Sticker – Fing’rs?
Friday, July 5, 2013
Holo Water Marble
Yes, the process is pretty complicated but the end results are totally worth it (Seriously, watch the video if you want any of the following to make sense). I tend to not tape up the skin around my nails because it takes so much time. Instead, sometimes I will rub lotion or chap stick around the edges of my fingers (where the tape would normally go) which makes removing any polish that sticks to your fingers super easy (I often wrap a little piece of cotton ball around a wooden manicure sticks and dip it into nail polish remover to clean up the mess that water marbling leaves on your fingers). I also cheat a little in that once I stick my finger in the bowl to pick up the marbled design, I don't clean up the extra polish that is left in the bowl, as shown in the video. This is why my design looks like it has two layers or marbling. I might say it was intentional, but really its just me being lazy : )
Anyway, to achieve this look I did a base coat of Milani's HD, which is a silver holographic polish. Then for the marbling (the colors I dripped into my cup filled with room temperature water ) I used Black Out and White On, both from Sally Hansen, Xtreme Wear. What is really nice about using white polish in marbling is that it spreads out super thin so that more of your base coat is visible (The white polish actually looks clear). That's why you can see so much of the holographic polish underneath.
Sally Hansen Hard as Nails Xtreme Wear - Black Out
Sally Hansen Hard as Nails Xtreme Wear - White On
Milani - HD
Wednesday, July 3, 2013
Independence Day Mani
Happy July 4th everyone!
Revlon Top Speed - Black Star
Julep - Fireworks
Cosmetic Arts - Light Blue Sparkle (these polishes have no names)
(Stamping) Maybelline Color Show - Sapphire Siren
(Stamping) Konad Red
BM14 - stars
Revlon Top Speed - Black Star
Julep - Fireworks
Cosmetic Arts - Light Blue Sparkle (these polishes have no names)
(Stamping) Maybelline Color Show - Sapphire Siren
(Stamping) Konad Red
BM14 - stars
Monday, July 1, 2013
Feeling Fancy
Morning all! So today I have something special from one of my favorite collections. And yes, I'll admit I was feeling a little flashy when I did this manicure (as if you couldn't tell!). This gorgeous navy blue is from the new collection from Maybelline called Maybelline Color Show. The colors from this collection are absolutely gorgeous and are meant to represent fashion on the run way, which explains why most of the Color Show polishes are vibrant and super intense.
Shown in the photo is two coats of Sapphire Siren, though I probably could have gotten away with one coat. And of course to add a little glam on my ring fingers, I used Color Club's Orna-Minted which is a glitter polish consisting of small and large silver hexagons in a clear base. I had to do 4 coats of Orna-Minted to completely cover my nail. As always, I used Seche Vite as my top coat which gave me that awesome shine. Finally for even more glam, I added a 3D bow which I purchased from amazon a few months ago. I love these bows because they are inexpensive and really add a spark to any manicure. I would say my only issue is that these bows are a bit too big (measuring about 1/3 of an inch) and there were no measurements listed on the amazon website when I purchased them. While the bows are definitely cute, their large size made it difficult/annoying to complete normal tasks (i.e. washing dishes, washing my hair). However, with a good amount of nail glue these bows stayed on my nails for 5 days before coming off. One came off while I was working out at the gym and the second one I ended up snapping off myself after it became caught in my hair one too many times.
Maybelline Color Show - Sapphire Siren
Color Club - Orna-Minted
3D Bow Ties (amazon)
Subscribe to:
Posts (Atom)